Composite Document Editor
The composite document editor is a powerful feature that lets you easily create a hyperlinked (HTML) document from related items in the repository. To create a composite document format, you browse over the meta model, selecting
the types, attributes and relationships of interest to you.
This section covers the following topics:
For example, we might be interested to see:
- A Business Unit, and for that business unit, its description
- Related Applications, via the owns link
- For each application, the application name, the date of first production use and the relationships to Vendor, Platform Type and usage of Data Collections
- For Vendors, we may with to include these items, listing for each the contact details
Building the Document Structure
To build a document like this, we would open the Composite View browser and select the Business Unit type, followed by the New button.
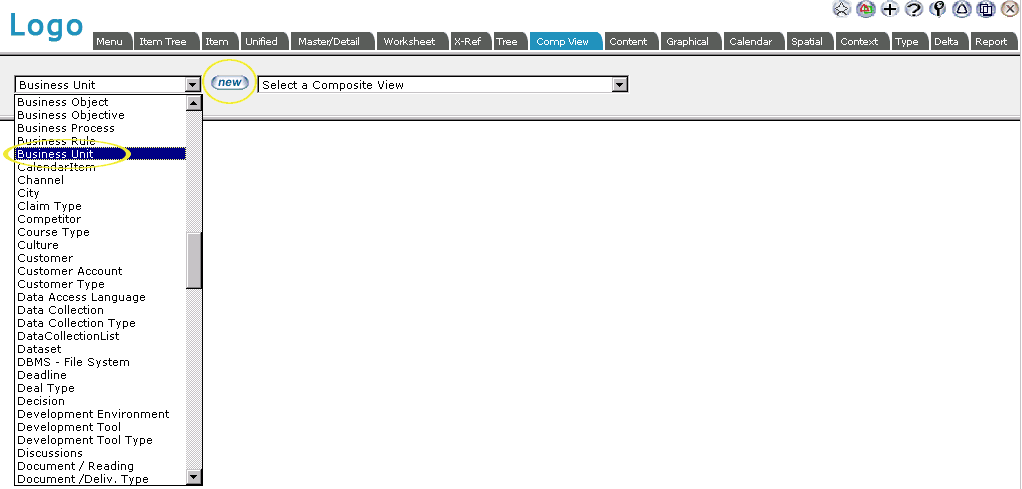
EVA Netmodeler will create a new composite view with "Business Unit" as the base type.
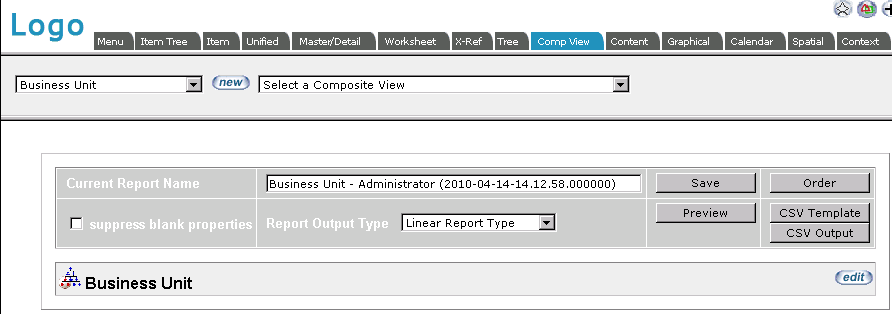
The buttons on the Composite View specification have the following functions:
- Save the current Composite View specification. To create c cloned copy of a Composite View specification, simply change the name of the Composite View before selecting the save button
- Order allows you to specify the order in which the types will appear in the Composite View specification and resulting reports. See below for details of how to add additional types to eh Composite View specification
- Preview will open the results window for the current Composite View sophistication
- CSV Template and CSV Output are used to generate a comma separated values output file for use in spreadsheet applications or an external report writer
The suppress blank properties option is used to suppress the display of properties that have not had values assigned to them yet.
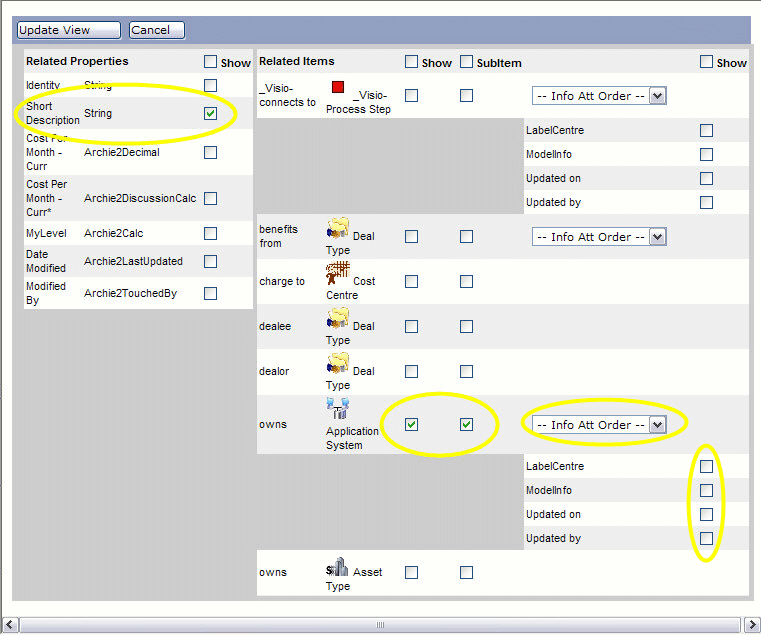
When we select the edit button next to one of the types included in the composite view, EVA Netmodeler will then display
the definition details of that type. We can select which properties and relationships we are interested in. For each of these,
we can indicate whether we want it to be treated as a sort key. You can designate up to three levels of sorting. Where we
select a relationship, checking the first box offered will list the relationship in the generated report. Checking the second box
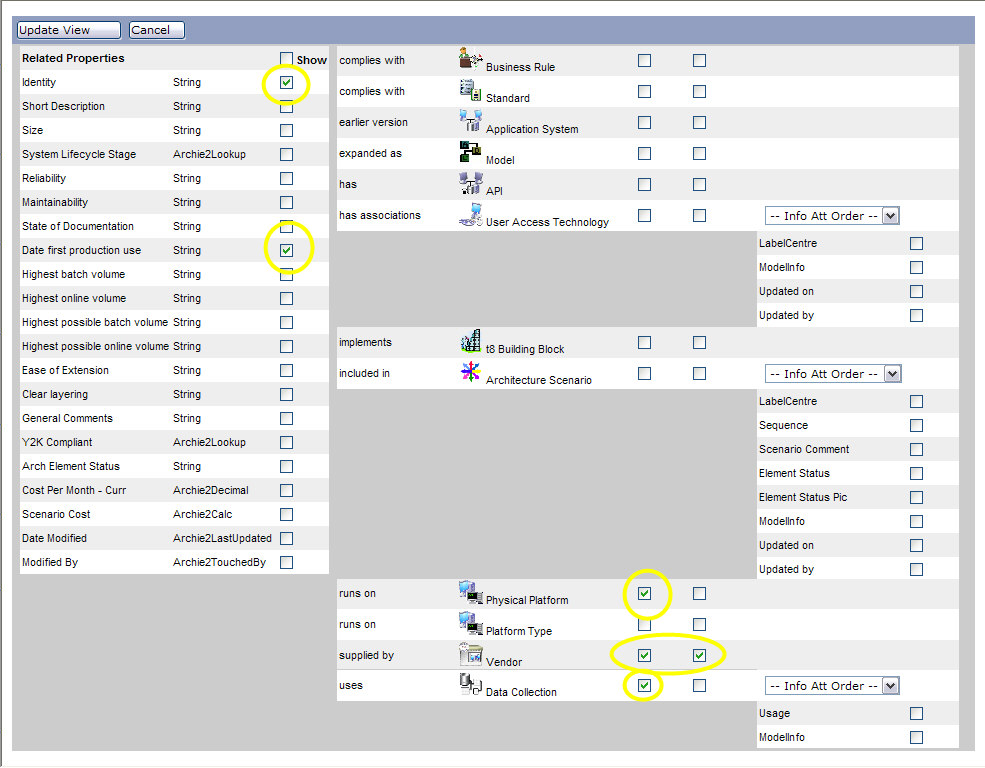
as well will cause the related items to also be included in the report specification. In the figure below we have selected the
"Short Description" property of the Business Unit type. We have also elected to show the related applications systems
(check box in the "show" column), and to include the details of the related Application Systems item in the report. IT is also
possible to display properties from the info node, if one exits. In this example we have not selected any of the info node
properties. Lastly, you can elect to sort the related items based on the value of one of the info node properties. Again, we have not used this option in our example. We select the update view
button to return to the main Composite View definition window.
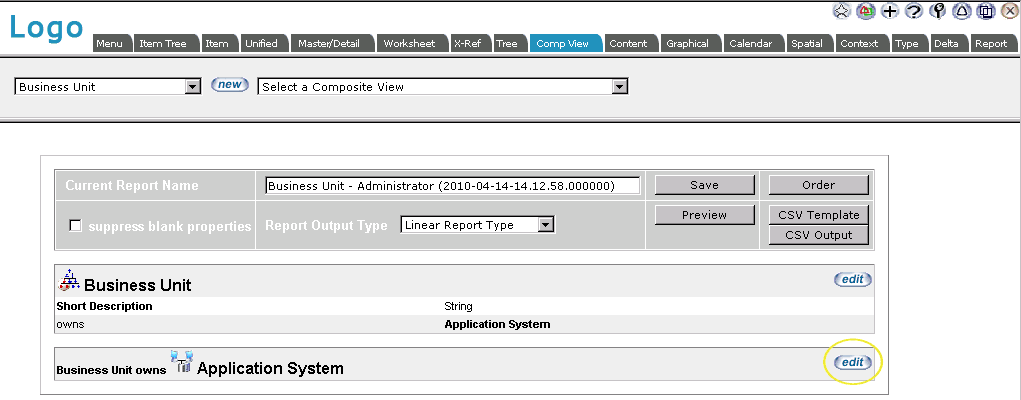
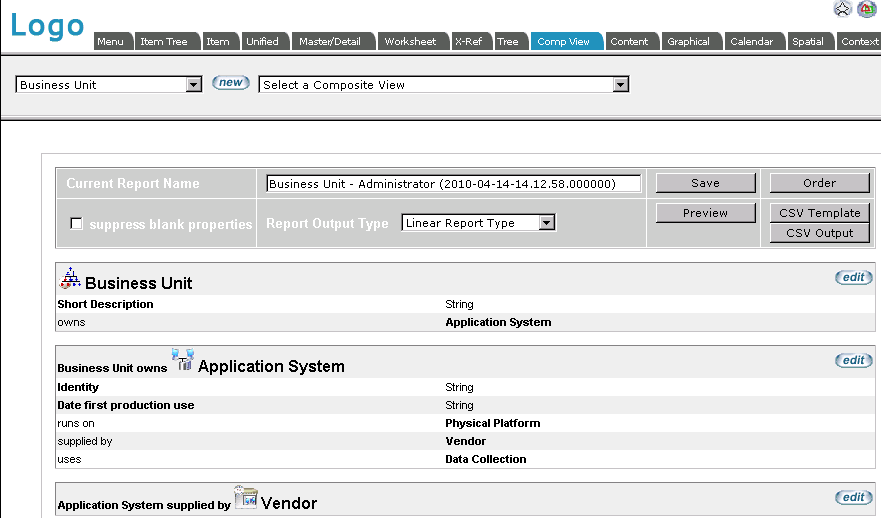
The Composite View definition now includes the selected properties and the related types for which the subitem option was selected. Selecting the edit
button next to the related type will open the Composite View item specification window.
We can then edit the detail of the related items to indicate which attributes of these we want, which relationships are of
interest and so on. The figure below shows the process of selecting the "Identity" and "Date of First Production use"
properties of the related Application Systems. On the right of the figure we can see that the related "Physical Platforms" and
"Data Collections" will be included in the report. Lastly we can see that the details of the Vendor that supplies the Application
System will also be included in the report. (The properties of the Vendor would still need to be specified in the same way as we have done for the Application System).
The figure below shows the summary of the composite view specification resulting from the steps described above. By selecting to include further types we can build very complex composite documents.

Viewing the Generated Document
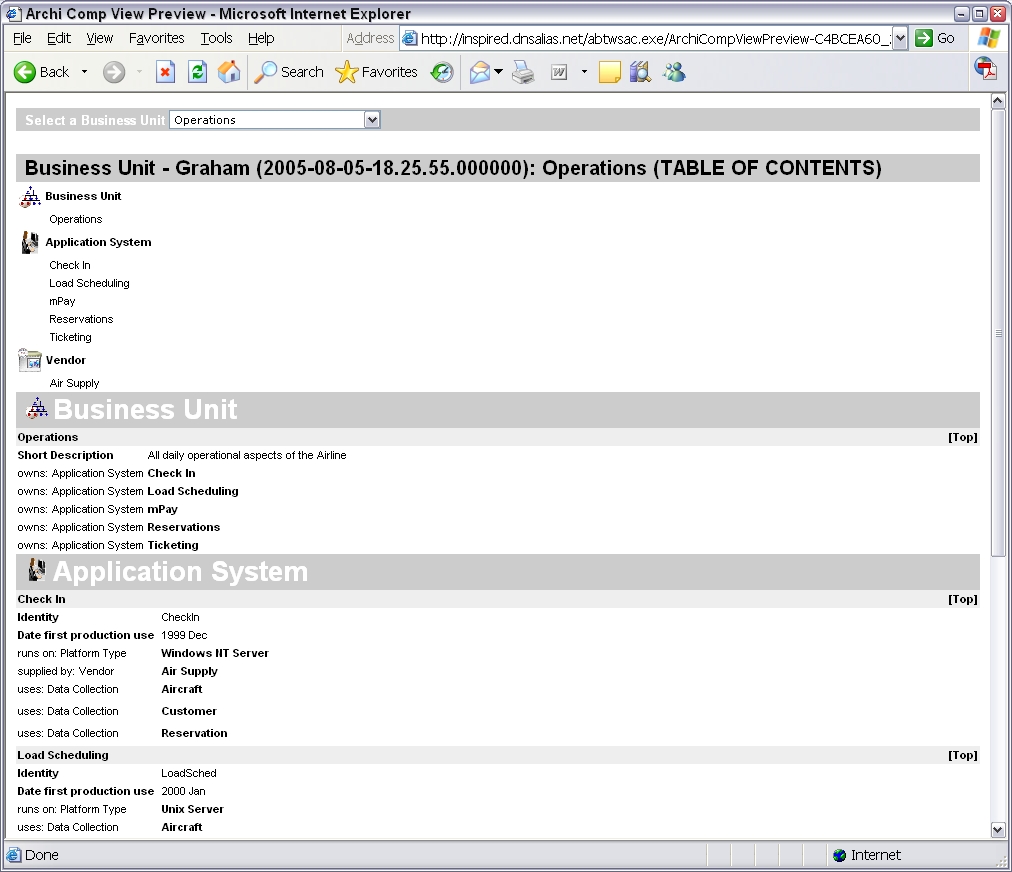
Once the document specification is complete, pressing the preview button will generate an output page. Selecting the start
item will result in the related information being retrieved and the composite document being generated. If you wish to, you
can then return and adjust the definition, until you are happy with the results. At that time, you can save the document
specification. Doing this will attach it to your User Menu. You can grant permission to other users to use it by linking it to their menus.
The generated report has a table of contents by type, listing the items of that type included. These item names are
hyperlinks which will take you directly to the relevant item. A section of the report is generated for each type included. In the
section, each instance of that type will be listed, together with selected attributes and relationships. The latter are preserved as hyperlinks, if the associated items are included in the report.

Saving the Document for Reuse and Sharing with Other Users
From the definition screen, you can name the Composite View and save the definition so it can easily be reused again in
future with the same or a different initial item. When you do this, it will automatically be attached to your user menu list. You can share the document definition with others by linking it to their menus.

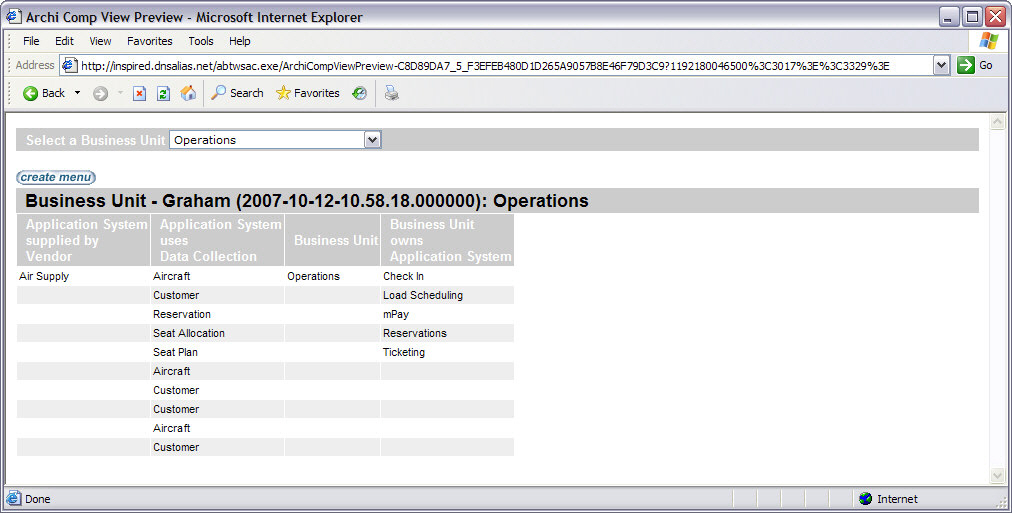
Columnar Format
The generated report can also be given in an alternate columnar format. See below.

Tree Format
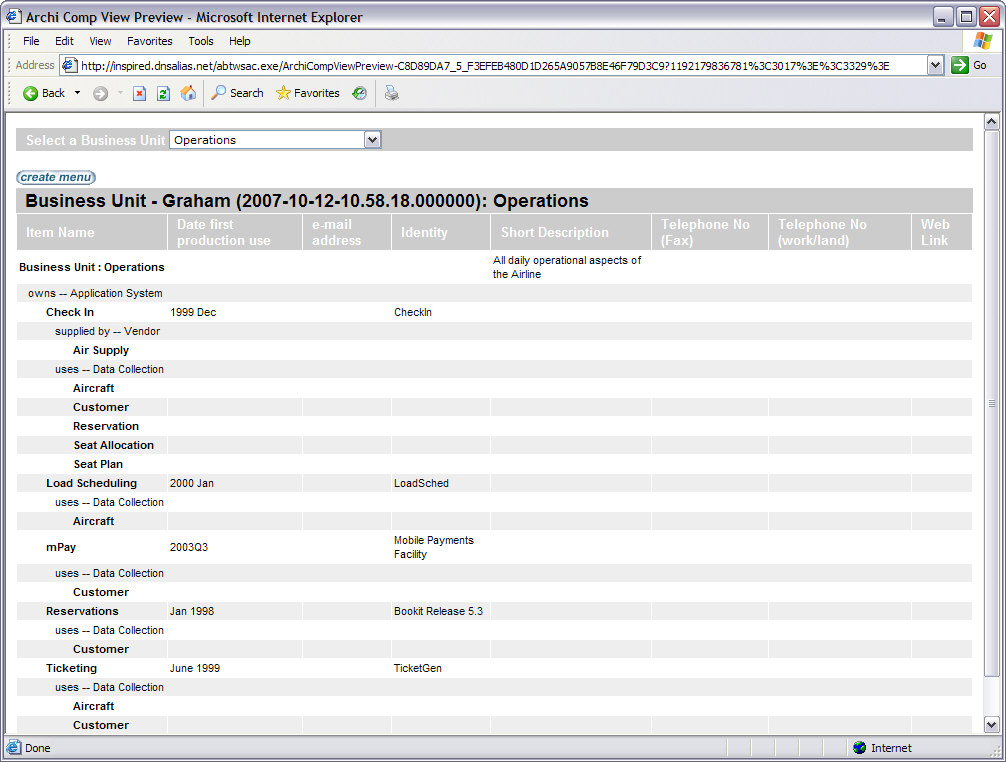
The Tree format of the Composite View shows all of the items of the types specified in the composite view specification as
an indented hierarchy on the left-hand side of the report. The properties of all of the types included in the report become
columns on the report. Wherever a property name occurs on more than one item type that column is reused for all types that had the property.

CSV Output
This option generates a Comma Separate Values file containing the data from the report. The CSV file will be generated
after you specify the scope of the report. The scope is either ALL items or a specific item. The Composite View browser produces a hyperlink to the output file.

Clicking on the link will either open the file in the browser window, or prompt you to for a download location depending on the browser type and settings.
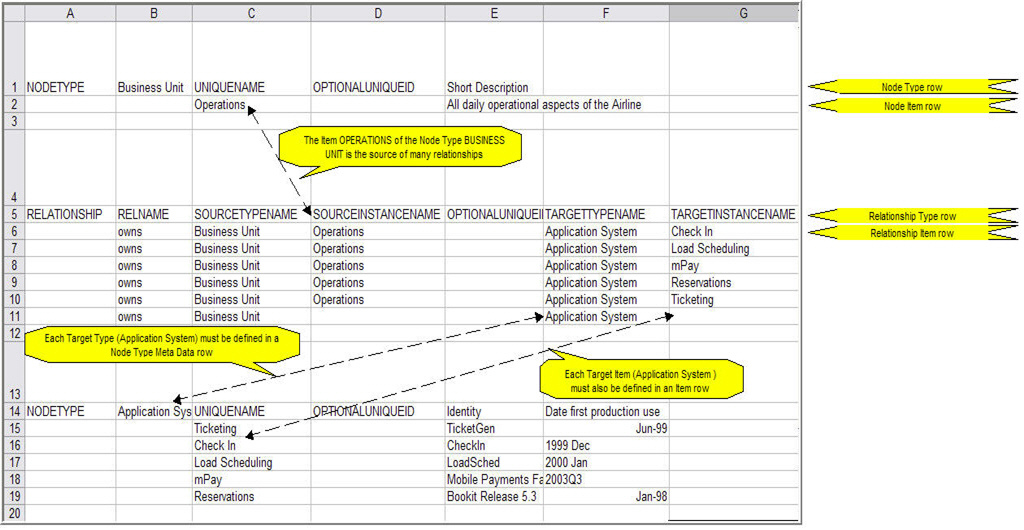
The diagram below shows the contents of a CSV file that has been opened in a spreadsheet application. Spreadsheet
applications usually place each successive comma-delimited value into a separate column, making it much easier to view and work with the data.
The Composite View CSV file includes both Type rows and Item rows. Type rows define the type of data, while the Item rows contain the actual data from the items in the repository.
There are four kinds of rows in the file :
- Node Type rows define the name and properties of a type of item. Note that only the properties included in the
Composite View specification will be included in the file. There may be many Node Type rows in the file, one for each type of node included in the Composite View specification.
- Node Item rows: each Node Type row is followed by at least one Node Item row. Each Node Item row contains the properties of a single item of that Node Type, listed in the columns formed by the preceding Node Type row.
- Relationship Type rows define the name and properties of a type of relationship. Note that only the relationship
types included in the Composite View specification will be included in the file. There may be many Relationship Type rows in the file, one for each type of relationship included in the Composite View specification.
- Relationship Item rows: each Relationship Type row is followed by at least one Relationship Item row. Each
Relationship item row contains the properties of a single relationship of that Relationship Type that exists between an
included item and another included item, listed in the columns formed by the preceding Relationship Type row.

CSV Template
The CSV Template option produces a CSV file with only the Node Type and Relationship Type rows that would result from
running the Composite View report. This is useful for setting up a spreadsheet file with the correct row types and property
names prior to doing data capture into the spreadsheet. The populated spreadsheet can then be imported using the Import
utility. This is a quick method of doing bulk data capture when the source data is already available in electronic form.

|